Learning Goal #1
Hematology: I will be able to list and identify types of white blood cells (WBCs) in order to perform a normal and abnormal standard WBC differential, and show what potential disease states could occur with an above average percentage of cells.
Preparation: I used a wedge smear technique to prepare the slide, in which a drop of blood is placed on a slide and the edge of another slide is used to smear the drop into a thin layer. This is so that the individual cells can be examined when placed under a microscope.
|
Staining: The purpose of staining slides is to make cells more easily recognizable under a microscope. I stained slides using three different techniques.
|
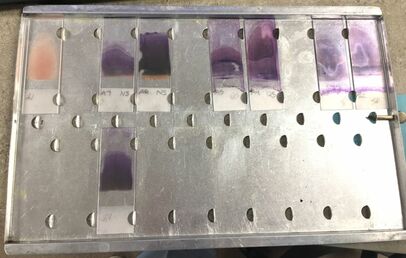
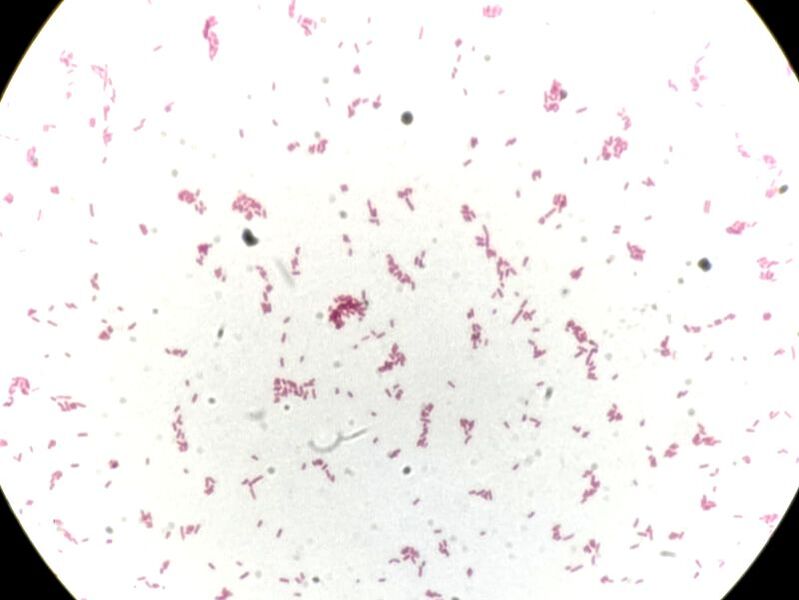
The first slide (the pink one) is what a prepared, unstained slide should look like. The left set of two were stained manually (neat stain), the middle set of two were stained using the Quick Slide stainer, and the right set of two were stained using a Sysmex analyzer.
|
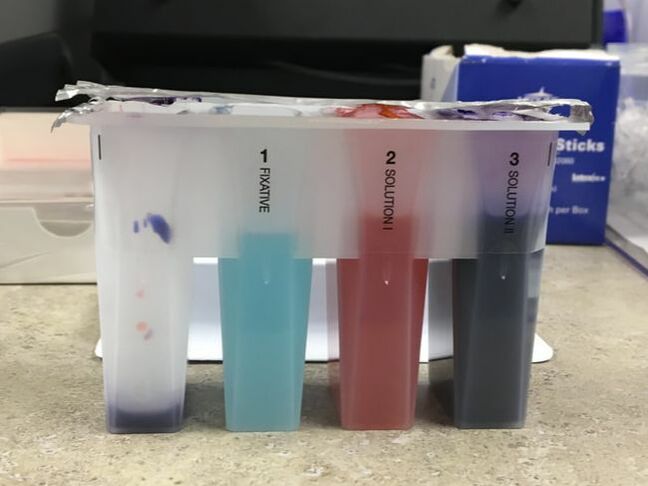
These are the solutions used in a neat stain. The slide is dunked in the first one 5 times, then allow the runoff to drip into the left container before repeating the process for the second and third solutions.
|
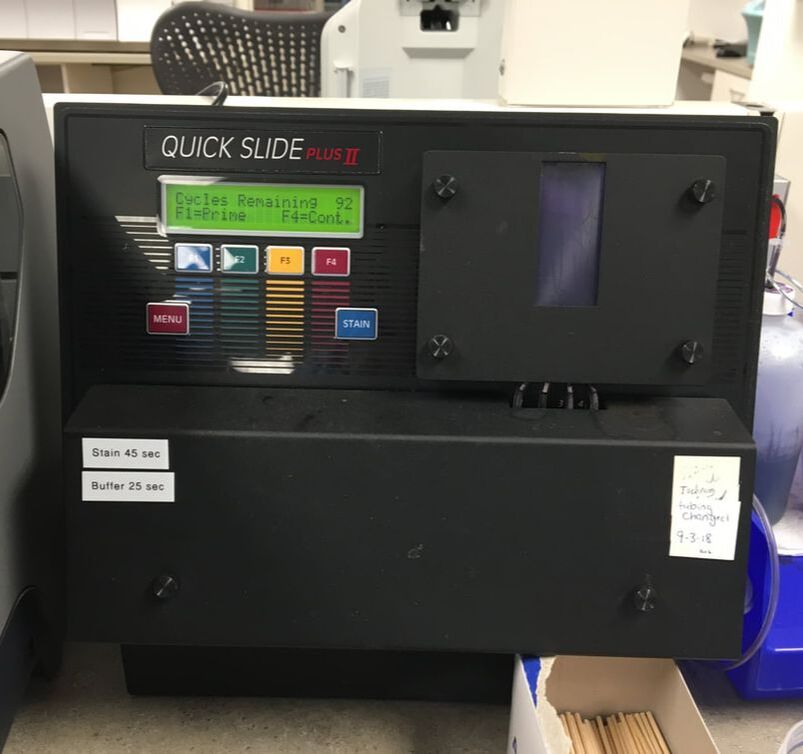
This Quick Slide automated slide stainer was the second method I used to stain slides.
|

This Sysmex analyzer was the third method I used to stain slides.
|
|
Examination: I examined the slides at three different powers: 10x, 40x, and 100x
|
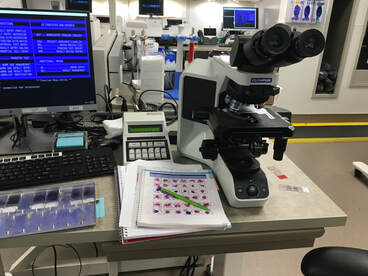
This is where I performed the differentials, using the counter to the left of the microscope to keep track of the types of WBCs I saw as I went along.
|

Types of WBCs: There are 5 main types of WBCs counted in a differential
- Neutrophil: Normal range for adults: 50-70%
- May be segmented (small lobes connected by thin filaments) or banded (C or S shaped without filaments)
- An above average percentage may indicate: bacterial infections or stress
- Eosinophil: Normal range for adults: 0-5%
- These were described to me as “strawberries with sunglasses," with a few lobes connected by thin filaments and coarsely clumped chromatin
- An above average percentage may indicate: allergic reactions, autoimmune diseases, parasitic worms
- Basophil: Normal range for adults: 0-1%
- These were described to me as looking like large gumballs, also has very coarsely clumped chromatin
- An above average percentage may indicate: cancers, chicken pox, hyperthyroidism
- Lymphocyte: Normal range for adults: 20-40%
- Has condensed chromatin with a large nucleus compared to the rest of the cell
- An above average percentage may indicate: mononucleosis, whooping cough, viral infections
- Monocyte: Normal range for adults: 3-11%
- Typically larger and more “spread out” than other WBCs, with a kidney shaped nucleus
- An above average percentage may indicate: malaria, tuberculosis, fungal infections
Learning Goal #2
Blood Bank: I will be able to list all blood types including Rh factor and explain the genetic relevance of each in order to perform a standard forward and reverse type and Rh on each sample. I will also be able to perform a standard crossmatch as well as explain the importance of crossmatching and the problems that could occur with mismatched blood.
|
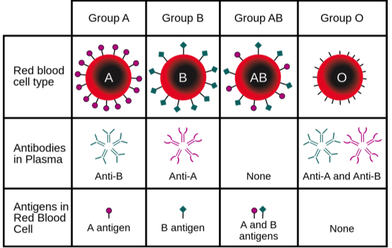
Blood Types: There are four blood types: A, B, AB, and O. A person’s blood type can also be either positive or negative (known as the Rh factor) which is determined by whether or not D antigens are present in the blood. There are two main components in blood: red cells (which contain antigens), and serum (which contains antibodies).
|
|
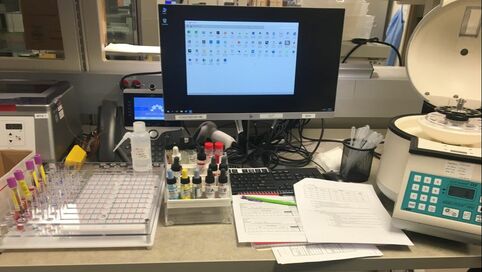 This is where I performed blood type tests, with all of the test tubes on the left, next to that is the serums and red cells that I added to each sample, then my notebook where I recorded my results, and on the right is the centrifuge where I spun down each sample.
Testing for Blood Types: I performed both forward and reverse groupings when testing for a patient’s blood type.
- First, I set up 5 test tubes: 3 with patient red cells and 2 with patient serum.
- I added Anti-A, Anti-B, and Anti-D serum to the patient’s red cells (known as forward grouping)
- I then added A1 and B cells to the patient’s serum (known as reverse grouping)
- After that, each test tube was spun down in a centrifuge for 15 seconds. Once removing them, I swirled the contents by hand and write down which ones agglutinated, or clumped together, and which ones did not.
- If agglutination was present in the forward grouping, then those red cells are positive for the respective antigens. For example, if there is agglutination with the Anti-A serum, then that blood contains A antigens.
- The forward groupings and reverse groupings should be opposite. Otherwise a discrepancy is present, which could result from antigen/antibody problems or technical error.
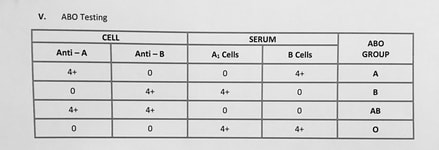
This chart shows how to interpret agglutination (4+) in a blood type, and how to check if the forward grouping (cell) is the opposite of the reverse grouping (serum).
|
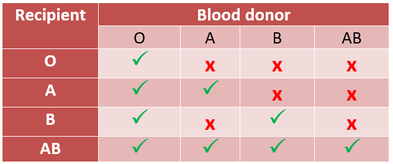
This chart shows which blood types are compatible with each other for receiving and donating blood.
|
Crossmatching Blood: When crossmatching blood, I combined patient serum with donor red cells. I looked for clotting or agglutination, which would be a result of the antigens from one blood type reacting with the antibodies of another blood type. If this occurs, then the blood types are not compatible, as they would clot together within the patient and result in the patient’s death (this is why crossmatching blood before a transfusion is so important).
Learning Goal #3
Urinalysis: I will be able to list identifiable components of a chemistry urinalysis and a microscopic urinalysis as well as correlate the results from both in order to determine the state of the patient’s kidney.
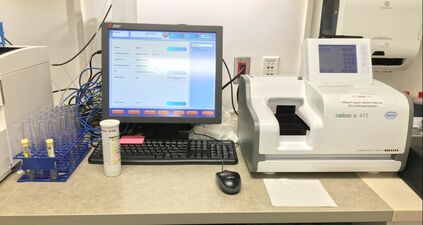
On the right is the cobas analyzer that I used to perform chemistry urinalyses.
|
Chemistry Procedure: Performing a chemistry urinalysis with a chemstrip was fairly easy. I used a cobas urine analyzer and manually put in the color and clarity of the sample. Then I used a pipette to drop some of the sample on each square of the chemstrip, set it on the cobas, and let it do the rest. Each pad on the chemstrip tests for a different element in the sample, and changes color depending on the amount present.
|
|
Chemistry Analysis: There are 10 main components of a chemistry urinalysis.
|
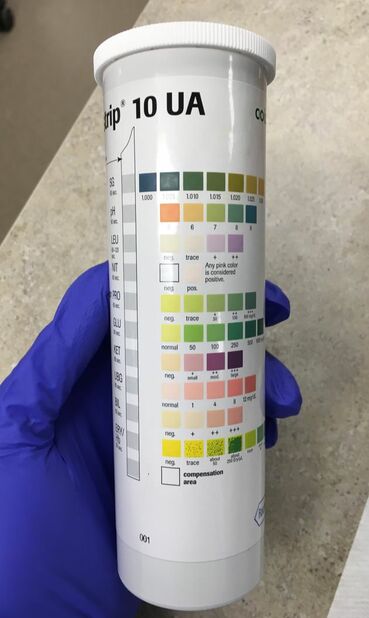
This is the chemstrips container, it shows how to read the changes in colors for each element of the urine.
|
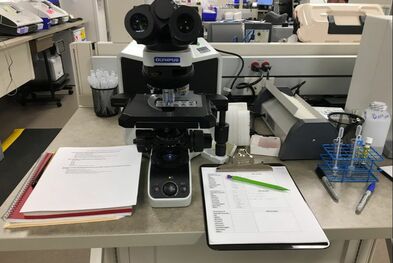
Here is where I performed microscopic urinalyses and recorded my results on the clipboard to the right.
|
Microscopic Procedure: For the microscopic urinalysis, I first poured about 3 mL of the sample into a test tube and spun it down in a centrifuge. Once that finished, I poured off some of the sample, leaving about 1-2 mL. I then used a pipette to pick up the sediment button from the bottom of the tube and placed it onto a slide for examination under a microscope.
|
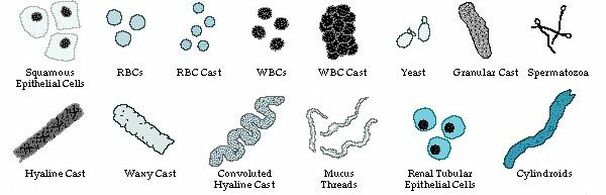
Microscopic Analysis: Anything found in the chemistry portion of a urinalysis should match what is found in the microscopic analysis. For example, if red blood cells were present in the chemistry test, then they should be visible under a microscope. If the results do not match, then additional testing should be performed to find out what caused the abnormal results. Some common things I found when performing microscopic urinalyses include:
- Squamous epithelial cells
- Red blood cells
- White blood cells
- Hyaline casts
- Bacteria
- Mucus threads
Learning Goal #4
Kit Testing: I will be able to perform test for Streptococcus A, understand theory in positive results, and identify bacteria in a gram stain; perform tests for Influenza A and B and share knowledge of each state; and perform test for occult blood and describe disease states associated with positive results.
|
Strep A, Flu A & B Procedure: The tests I performed for strep A and flu A & B were quite simple, all I had to do was follow the prompts given on the Alere i clinical analyzer.
|
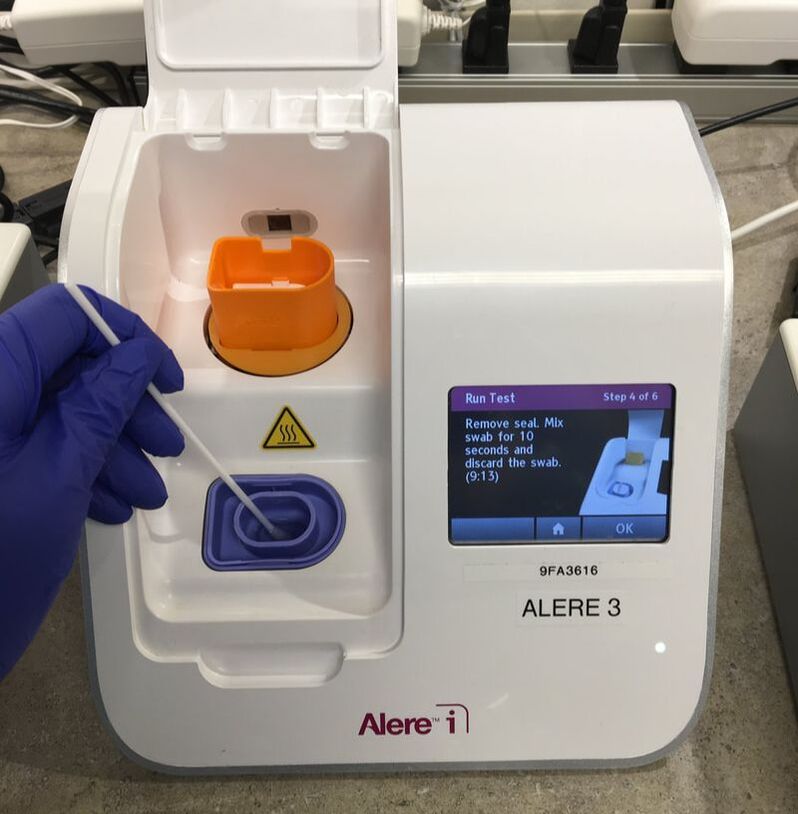
In this picture, I am mixing the patient swab in the sample receiver of the Alere i clinical analyzer.
|
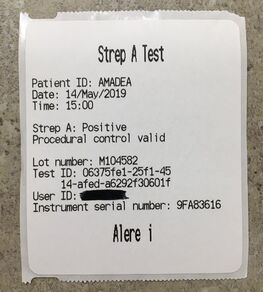
Here is an example of the sticker the Alere i analyzer prints once it finishes running a test.
|
Strep A Test Results: From the Alere i Strep A package insert, “Alere™ i Strep A utilizes isothermal nucleic acid amplification technology for the qualitative detection of Group A Strep bacterial nucleic acids.” This essentially means that if the test detects the presence of bacterial nucleic acids specific to strep A, then the patient is positive for strep A.
Flu A vs. Flu B: There are two main types of the influenza virus, known as flu A and flu B. Flu A is more common than flu B, and has many different subtypes. Flu A can also be present in many animals in addition to humans. Flu B is slightly less common than flu A, and is only present in humans.
|
|
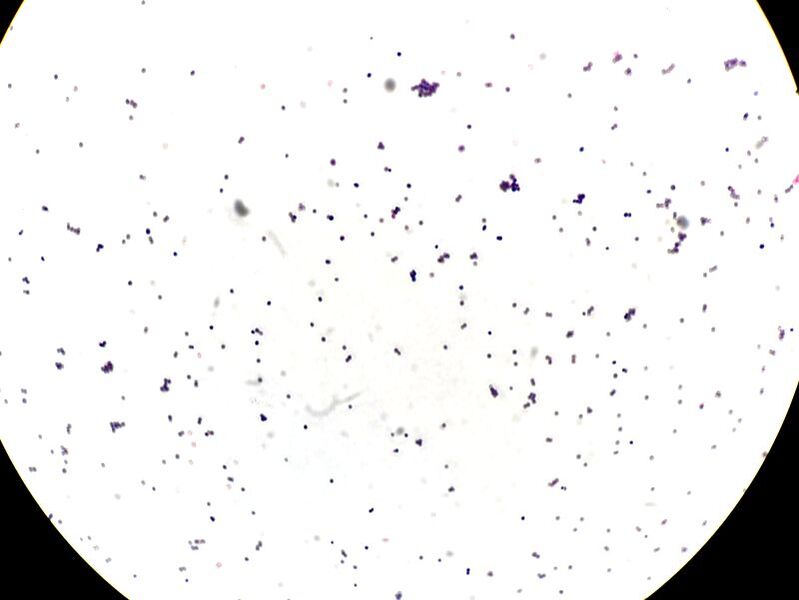
Gram Staining: A Gram stain is used to classify bacteria into two groups based on their cell wall composition. Gram-positive bacteria has a thick layer of peptidoglycan in the cell wall and stains a dark purple color, whereas the cell wall of Gram-negative bacteria has a thin layer of peptidoglycan and stains a red or pink color.
|
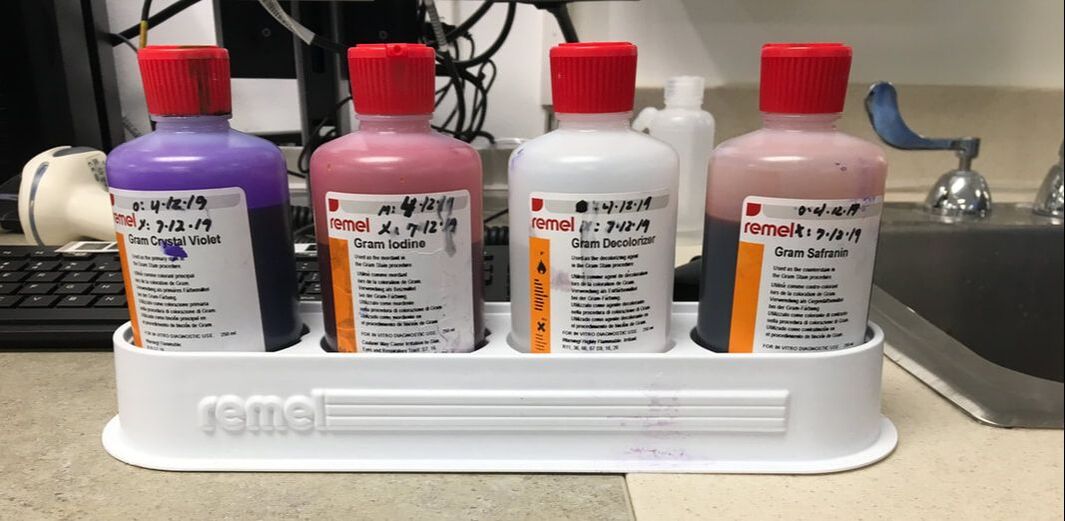
These are the four solutions (in order) used on the slide to perform a Gram stain test: crystal violet, iodine, decolorizer, and safranin.
|
Occult Blood: Occult blood is blood present in a fecal or gastric sample that is not visible without testing. I tested for both fecal and gastric occult blood using a HemaPrompt FG test. A positive test indicates abnormal bleeding in the digestive tract, which could result from ulcers, hemorrhoids, diverticular disease, inflammatory bowel disease, or colon cancer. To perform the test, I opened the test card, placed a small amount of the sample in both windows, and then closed the cover. After that I turned the test card over, removed the silver tab from the back, and waited 1 minute before interpreting the results.
- If the windows remained a brown or neutral color, then there is no occult blood present.
- If the windows turned a bright blue color, then this is a positive result, indicating the presence of occult blood in the sample.
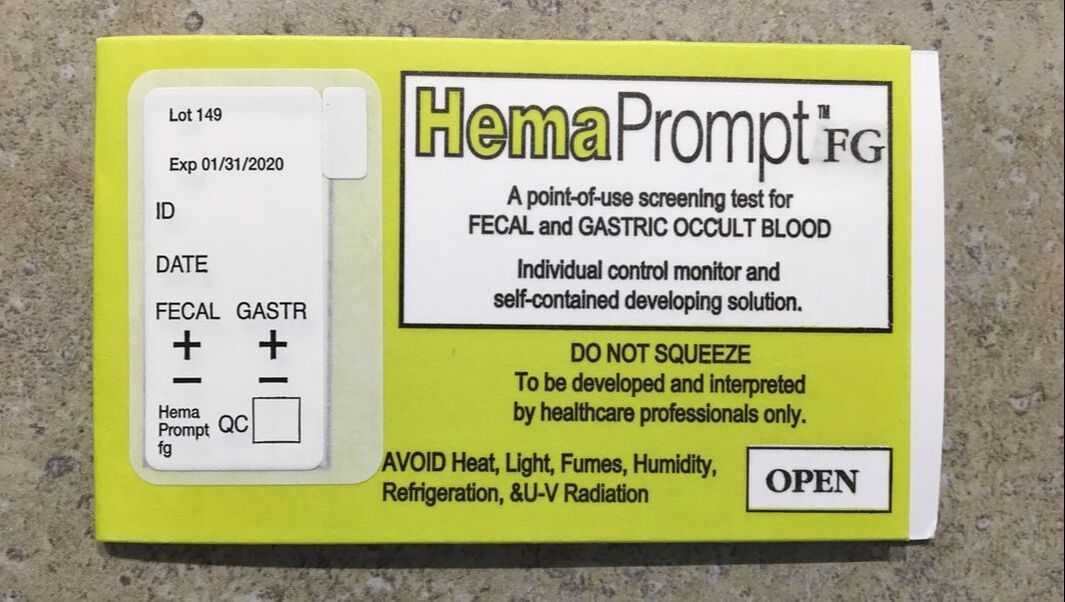
The front of a HemaPrompt card that can be used to test for fecal or gastric occult blood.
|
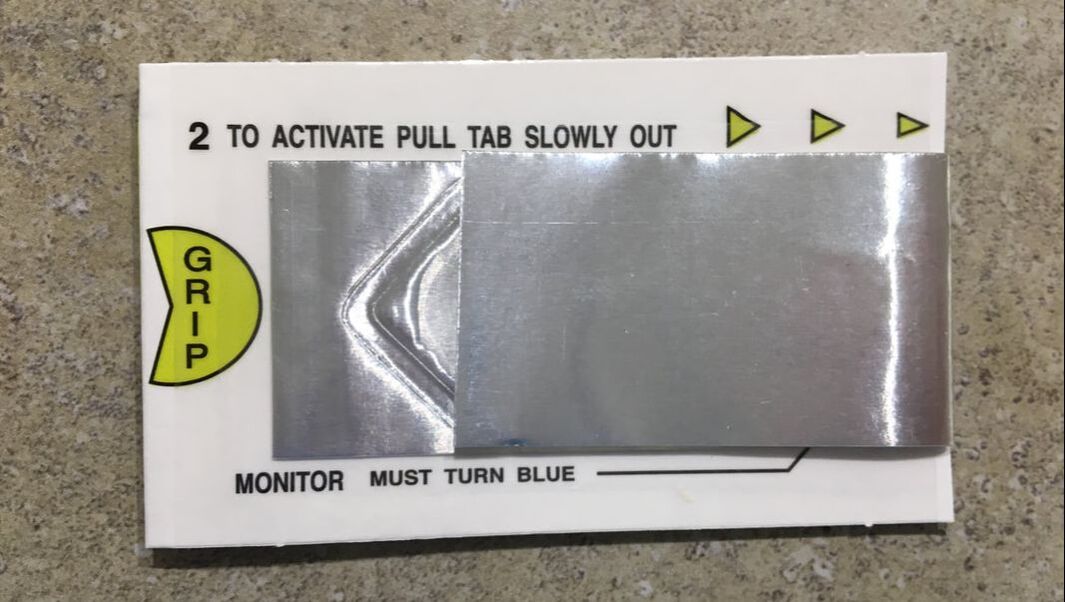
The back of a HemaPrompt card showing the silver tab that must be removed to activate the test.
|

This an example of a positive test, the blue color indicates the presence of occult blood.
|
Learning Goal #5
Chemistry: I will be able to list the components of blood, tube types, and anticoagulants. I will be able to list the tests run on each tube type and describe troubleshooting when using incorrect tube types. I will also be able to list electrodes and how they are used in chemistry.
|
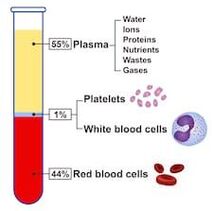
Components of Blood: There are two main components of blood that I mentioned briefly when sharing about blood typing. The first is serum, which is the liquid part of blood responsible for transporting blood cells and other materials throughout the body. The second is red blood cells, whose main job is to transport oxygen and carbon dioxide as a part of the respiratory system. Blood also contains white blood cells, which are responsible for the body’s immune system and production of antibodies, as well as platelets, which are pieces of cells that cause clotting at the site of an injury.
|
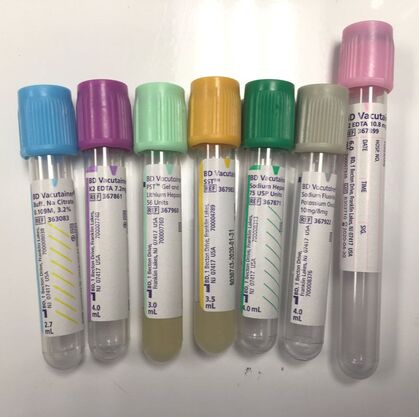
Tube Types: Mount Carmel’s Grove City lab used seven main tube types. Below are the colors, anticoagulants, and tests run for each tube type.
- Blue tops: Sodium Citrate binds calcium in the blood to prevent clotting
- Used to test for coagulation values, which evaluates the clotting ability of the patient’s blood
- Lavender tops: Ethylenediaminetetraacetic acid (EDTA) also binds calcium in the blood to prevent clotting
- Used to test for hematology values such as red and white blood cell counts
- This is what I used to perform WBC differentials from my learning goal in hematology (Learning Goal #1)
- Light Green tops: Lithium Heparin enhances antithrombin III, which inhibits clotting factors
- Used to test for corticosteroids (steroids) and electrolytes
- Orange tops: No additive
- Used to test for enzymes, electrolytes, iron, lipids, or drug levels
- Dark Green tops: Sodium Heparin also enhances antithrombin III to inhibit clotting factors
- Used to test for lead in the blood
- Gray tops: Sodium Fluoride and Potassium Oxalate together inhibit glycolysis, which is the breakdown of glucose (sugar) in the blood
- Used to test for glucose and lactose levels in the blood
- Pink tops: Also contains EDTA to bind calcium in the blood to prevent clotting
- Used to perform tests in blood banking, such as blood typing and crossmatches
- This is what I used to perform blood type tests from my learning goal in blood banking (Learning Goal #2)
Troubleshooting: Using the wrong tube types when testing patient blood samples can easily cause inaccurate results. For example, if a tube with a dark green top is used to test for sodium levels in the blood, the amount measured will be greater than it actually is because that tube type already has sodium in it as an anticoagulant. The type of tube being used is something that the tech should be aware of in order to ensure that accurate data is being recorded.
|
Electrodes: Ion-selective electrodes are used to test for specific substances in blood. For example, the electrodes I saw in the lab were used to test for sodium, potassium, and chlorine.
|
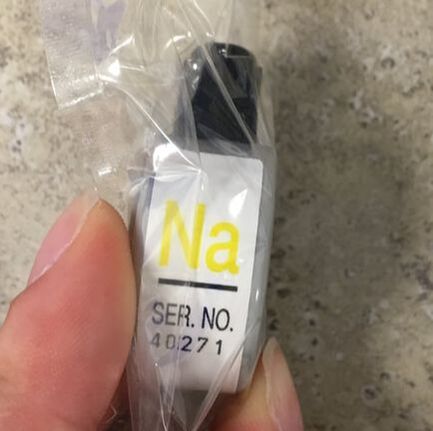
Sodium electrode
|
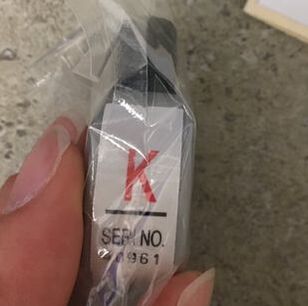
Potassium electrode
|
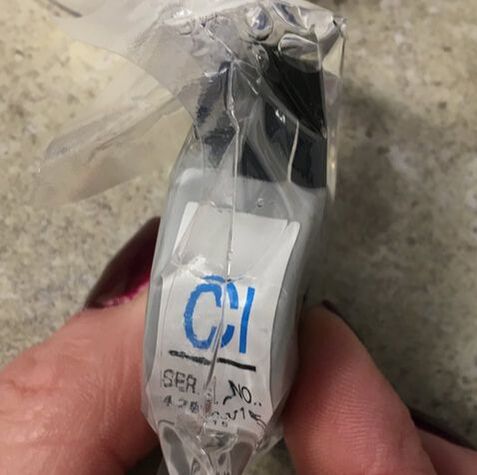
Chlorine electrode
|
